NE-Okie
Well-Known Member
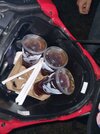
Those heated grips are game changers!Installed my new heated hand grips! Soo goood!
Follow along with the video below to see how to install our site as a web app on your home screen.
Note: This feature may not be available in some browsers.

Those heated grips are game changers!Installed my new heated hand grips! Soo goood!
I appreciate the report on how your suspension mods are working.Nice 100 Mile ride today with a small group of HD's, Trumph's, and Hondas. Perfect weather with a gentle breeze, low humidity, not a cloud in the sky. Estero to Labelle, back through Alva, down through Buckingham, Gateway, then on back to Estero. Took the opportunity to dial in my suspension and it is now just perfect for me (Hyperpro rear, YSS up front).
Perma-gray is a good way to describe our weather for the last week.Day 306, a 50 miler at 43 degrees and cloudy. We are in the season that we call here in Ohio "Perma-Gray" lol. Sun? What that?
I rode in the rain for a bit today myself. I first I was riding tight and tense but when I shook it out and relaxed I forgot about it.Day 308 of riding, another rain bath for the NC. 40 miles, 44 degrees and rain. Rode the "Water Works" loop named after the Cinti Water Works plant 20 miles from home that I pull a U turn in. Mostly flat and straight which is good when road conditions are iffy.
300 plus riding days a year I would say so. Rain doesn't bother me either. This morning's precipitation was a light mist and it hadn't rained in over a week so I was tense until I wasn't..... I actually enjoy riding in the rain and other conditions that drive most other motorcyclists indoors.
The driven-indoors-category...present.Almost all "tense" riding situations require you to relax, then it's not so bad. I ride in the rain so mush it's almost normal lol I actually enjoy riding in the rain and other conditions that drive most other motorcyclists indoors.

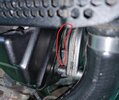
Agree, it's not 'easily' done but very doable with a little finesse & patience. Keep in mind when viewing pics that they were taken after reinstalling my Givi guard, of course. The first two pics denote the liquid flow (leak).
Obviously, the overall design pushes you to remove the pump with the engine pulled, or at least released from frame mounts so you can shift the engine to allow for removal of the assembled pump unit. However, I'm accustomed to dismantling things anyway (a learn as you go approach) and only after having everything off did I realize that the center bolt (blue arrow in pic) is not a mounting bolt but the bolt that holds all the pump parts together (pump, cover, gaskets & plate). Frankly, not knowing this probably saved me a bunch of wasted time trying to pull as a whole.
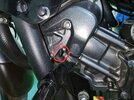
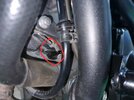
Even with this dismantled approach, the top & bottom bolts (red circles in pictures) cannot be removed without finesse & patience. I was able to remove them by using a multi-step approach - dethreading these bolts from the engine, so that I could pull the pump from engine and then turn it every so slightly allowing me to turn (thread) the bolts out of the loosened pump/cover assembly, you will not be able to pull the bolts out without harming either threads or mounting holes. Of course, do the opposite steps to re-install but being even more careful not to unseat gaskets or o-rings.
If you find yourself getting frustrated, best to walk away and come back to it after calming down