StratTuner
Site Supporter
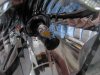
I am replacing the headlight bulb today.
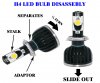
I have [THIS] set of LED Bulbs.
There are two LEDs on the bulb. One is set a little more forward than the other.
Which way is UP?
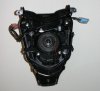
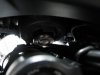
Here's a photo.

I could hook the light up to the system and turn it on.
Toggle between dim/bright and see which LED comes ON for bright....
but that doesn't answer the question. Which way is up?
It's a VERY difficult install, so I'd like to get it correct the first time.
I have [THIS] set of LED Bulbs.
There are two LEDs on the bulb. One is set a little more forward than the other.
Which way is UP?
Here's a photo.
I could hook the light up to the system and turn it on.
Toggle between dim/bright and see which LED comes ON for bright....
but that doesn't answer the question. Which way is up?
It's a VERY difficult install, so I'd like to get it correct the first time.