

- Joined
- May 16, 2012
- Messages
- 5,265
- Reaction score
- 7
- Points
- 0
- Location
- Vancouver BC Canada
I'd like to start off with a heartfelt thanks to Dale (HondaBikePro) for selling me his original fuel cell V1.0
He made it pretty much exactly as how I envisioned making one, long before even buying my NCX back in 2012. Alas, I have no access to proper tools, materials, or a place to do any real manufacturing, so it was more of a wistful pipe dream unfortunately. I'm not saying I have a fraction of Dale's talent either, but I have taken a few stabs at custom design work and welding in my lifetime too.
So. Having acquired the HBP fuel cell, there were a couple things I wanted to do before installing it and filling it up with gasoline. As it arrived, it had an external threaded filler spigot, with an anti-spill breather valve and tube on the plastic cap. Perfectly functional and eminently practical, but I wanted to be able to have a flat surface to place luggage or a RotoPax fuel cell on top of.


I wanted a low profile flush fitting sportbike type filler cap, but the way the OEM ones are made, they have a rather complex in-tank configuration, with water drain tubes, vent tubes etc., built into the tank itself; beyond my time, skill, energy, and funding to duplicate. The next closest thing is an aircraft or "generic" fuel cap and mount that you find on the usual suspect plastic drag race kind of Jaz, RCI, and so on fuel cells-

This would entail *gulp* cutting off the external spigot and hacking a giant hole the fuel cell. A point of no return...

Now unfortunately, the heat of the original welding of the spigot on to the thin aluminum sheet, had warped the top surface of the fuel cell a wee bit. Not enough to notice when the original cap was on, and it made no difference to the looks/volume/efficiency, but because I was mucking with it and needed a perfectly flat flange surface, it was something I had to deal with. Also, because of the original hole opening near the edge of the top, I had an extremely tiny margin for error to get the flange to fit on and have the new hole juuuuuust eclipse the edge of the hole, yet not be too close the edge of the top/side, making no room for the fasteners to bolt down through. (More on this later)

I filled up and leveled off the dips with two part epoxy (additional areas around the new hole were also filled up and sanded down, bit no pics taken)


Ahh, there we go. (This took a few days worth of filling, sanding, measuring, re filling, re sanding, etc. *pant, pant*)

Now as mentioned earlier, I chose the generic aircraft style filler and mounting flange, but didn't want a red one with chrome ring. Yuck. Also, The method in which they are affixed to a fuel cell is very robust and simple, but offended my eye as to the aesthetics of things. I didn't want a bunch of sticky uppy threaded studs with nylock nuts bolted to them. (sigh, going this route was more complicated and spendy than one would actually imagine...)
I ordered some cool Stainless steel M8 Torx security button head bolts from a place in Australia. They would at least allow for a smoother surface for any luggage to be laid on top of, and they look freaking cool, lol.
Of course this complicated things, though. With the RCI fuel cap, came two steel flanges, with threaded studs tack welded to them. These flanges go inside the fuel cell from underneath, compressing a rubber gasket in between the inside of the cell and the outer flange, to keep everything liquid tight.


Since I wanted to use bolts down from the outside in, this meant I had to remove the threaded studs from the steel rings. Sounds easy, right? Wrong. As it turned out, removing the spot welds holding the bolts on didn't help. I thought I'd be able to simply unthread each bolt out of it's respective hole in the steel ring. Well despite looking like bolts, they were actually pressed in studs, requiring a bloody battle to try and punch out, even after completely cutting off the entire head of the "bolt". Good grief, that was a hellish job. The steel rings were very soft, and the heat from grinding warped and bent them into pretzels, pounding the studs out with hammer and punch made bowl shaped concave divots, auugh. Much work was needed to get them back to some semblance of "flat"...
Oh, and I had no room between the outer edge inner wall of the fuel cell and where the tops of two of the nuts for the bolts needed to be, going through the steel ring. The outer circumference had to be cut off and filed nearly flat, in order to fit up inside and compress the rubber gasket. Difficult to explain, but a chore, trust me ha ha!

Decided to go with the same black rubberized rocker guard paint I put on my HondaBikePro skidplate


The sourcing of fuel lines and 1/8th to 3/16th adapters was another story, but unworthy of going into detail. I glorped Form A Gasket #2 all over every applicable mating surface and fastener thread (ye gods that stuff is messy/sticky, my fingernails will be black for months...) and am letting it set up for at least 24 hours prior to putting the first tank of gas into it. I will report back with how that goes and if I have any hideous disasters with leaks, fireballs, etc., as soon as I can.
I'm sure there is lots I'm forgetting, and will update and/or add in stuff if I remember.
OEM tank breather location and hose

Adapter reducer elbow with appropriate size barbs

General hose routing

As tank lowers to closed

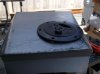
Final look of fuel cap and mounting flange

Time to fill it up...
Distance ridden on tank

Distance ridden on Reserve

Fuel Cell filled up to high as I was comfortable with this first test run (hard to see, but the bottom of the filler cap touches the level of the gas)

Amount of fuel put in the bike's tank, and the amount of fuel put in the Fuel Cell

The good news, is there doesn't appear to be any leaks, the vent holes I drilled seem to work-no pressure hissing or imploding of the cell, or vacuum fuel starvation due to lack of enough vent volume, and I didn't explode in a fireball mushroom cloud, heh heh.
The bad news, is I removed some precious tank volume due to the space taken up by the fuel cap design. I can't put in as much as the way the old external spigot and cap system was. Oh well. All things considered, I'm not going to cry over maybe 500 or so millilitres. I'm grudgingly satisfied so far with the end result. Time and use will tell the true tale, though. Wish me luck!
He made it pretty much exactly as how I envisioned making one, long before even buying my NCX back in 2012. Alas, I have no access to proper tools, materials, or a place to do any real manufacturing, so it was more of a wistful pipe dream unfortunately. I'm not saying I have a fraction of Dale's talent either, but I have taken a few stabs at custom design work and welding in my lifetime too.
So. Having acquired the HBP fuel cell, there were a couple things I wanted to do before installing it and filling it up with gasoline. As it arrived, it had an external threaded filler spigot, with an anti-spill breather valve and tube on the plastic cap. Perfectly functional and eminently practical, but I wanted to be able to have a flat surface to place luggage or a RotoPax fuel cell on top of.
I wanted a low profile flush fitting sportbike type filler cap, but the way the OEM ones are made, they have a rather complex in-tank configuration, with water drain tubes, vent tubes etc., built into the tank itself; beyond my time, skill, energy, and funding to duplicate. The next closest thing is an aircraft or "generic" fuel cap and mount that you find on the usual suspect plastic drag race kind of Jaz, RCI, and so on fuel cells-
This would entail *gulp*
cutting off the external spigot and hacking a giant hole the fuel cell. A point of no return...Now unfortunately, the heat of the original welding of the spigot on to the thin aluminum sheet, had warped the top surface of the fuel cell a wee bit. Not enough to notice when the original cap was on, and it made no difference to the looks/volume/efficiency, but because I was mucking with it and needed a perfectly flat flange surface, it was something I had to deal with. Also, because of the original hole opening near the edge of the top, I had an extremely tiny margin for error to get the flange to fit on and have the new hole juuuuuust eclipse the edge of the hole, yet not be too close the edge of the top/side, making no room for the fasteners to bolt down through. (More on this later)
I filled up and leveled off the dips with two part epoxy (additional areas around the new hole were also filled up and sanded down, bit no pics taken)
Ahh, there we go. (This took a few days worth of filling, sanding, measuring, re filling, re sanding, etc. *pant, pant*)
Now as mentioned earlier, I chose the generic aircraft style filler and mounting flange, but didn't want a red one with chrome ring. Yuck. Also, The method in which they are affixed to a fuel cell is very robust and simple, but offended my eye as to the aesthetics of things. I didn't want a bunch of sticky uppy threaded studs with nylock nuts bolted to them. (sigh, going this route was more complicated and spendy than one would actually imagine...)
I ordered some cool Stainless steel M8 Torx security button head bolts from a place in Australia. They would at least allow for a smoother surface for any luggage to be laid on top of, and they look freaking cool, lol.
Of course this complicated things, though. With the RCI fuel cap, came two steel flanges, with threaded studs tack welded to them. These flanges go inside the fuel cell from underneath, compressing a rubber gasket in between the inside of the cell and the outer flange, to keep everything liquid tight.
Since I wanted to use bolts down from the outside in, this meant I had to remove the threaded studs from the steel rings. Sounds easy, right? Wrong.
As it turned out, removing the spot welds holding the bolts on didn't help. I thought I'd be able to simply unthread each bolt out of it's respective hole in the steel ring. Well despite looking like bolts, they were actually pressed in studs, requiring a bloody battle to try and punch out, even after completely cutting off the entire head of the "bolt". Good grief, that was a hellish job. The steel rings were very soft, and the heat from grinding warped and bent them into pretzels, pounding the studs out with hammer and punch made bowl shaped concave divots, auugh. Much work was needed to get them back to some semblance of "flat"...Oh, and I had no room between the outer edge inner wall of the fuel cell and where the tops of two of the nuts for the bolts needed to be, going through the steel ring. The outer circumference had to be cut off and filed nearly flat, in order to fit up inside and compress the rubber gasket. Difficult to explain, but a chore, trust me ha ha!
Decided to go with the same black rubberized rocker guard paint I put on my HondaBikePro skidplate
The sourcing of fuel lines and 1/8th to 3/16th adapters was another story, but unworthy of going into detail. I glorped Form A Gasket #2 all over every applicable mating surface and fastener thread (ye gods that stuff is messy/sticky, my fingernails will be black for months...) and am letting it set up for at least 24 hours prior to putting the first tank of gas into it. I will report back with how that goes and if I have any hideous disasters with leaks, fireballs, etc., as soon as I can.
I'm sure there is lots I'm forgetting, and will update and/or add in stuff if I remember.
OEM tank breather location and hose
Adapter reducer elbow with appropriate size barbs
General hose routing
As tank lowers to closed
Final look of fuel cap and mounting flange
Time to fill it up...
Distance ridden on tank
Distance ridden on Reserve
Fuel Cell filled up to high as I was comfortable with this first test run (hard to see, but the bottom of the filler cap touches the level of the gas)
Amount of fuel put in the bike's tank, and the amount of fuel put in the Fuel Cell
The good news, is there doesn't appear to be any leaks, the vent holes I drilled seem to work-no pressure hissing or imploding of the cell, or vacuum fuel starvation due to lack of enough vent volume, and I didn't explode in a fireball mushroom cloud, heh heh.
The bad news, is I removed some precious tank volume due to the space taken up by the fuel cap design. I can't put in as much as the way the old external spigot and cap system was. Oh well. All things considered, I'm not going to cry over maybe 500 or so millilitres. I'm grudgingly satisfied so far with the end result. Time and use will tell the true tale, though. Wish me luck!
Attachments
Last edited:
