• A few people have been scammed on the site, Only use paypal to pay for items for sale by other members. If they will not use paypal, its likely a scam NEVER SEND E-TRANSFERS OF ANY KIND.

Holy cow that spring - aka I just installed the OEM center stand

that l do pig

New Member
Joined
Feb 6, 2014
Messages
48
Reaction score
0
Points
0
Location
Marietta, GA USA
Visit site
So new bike and first accessory. I installed the OEM center stand on my 2013 NC700X.

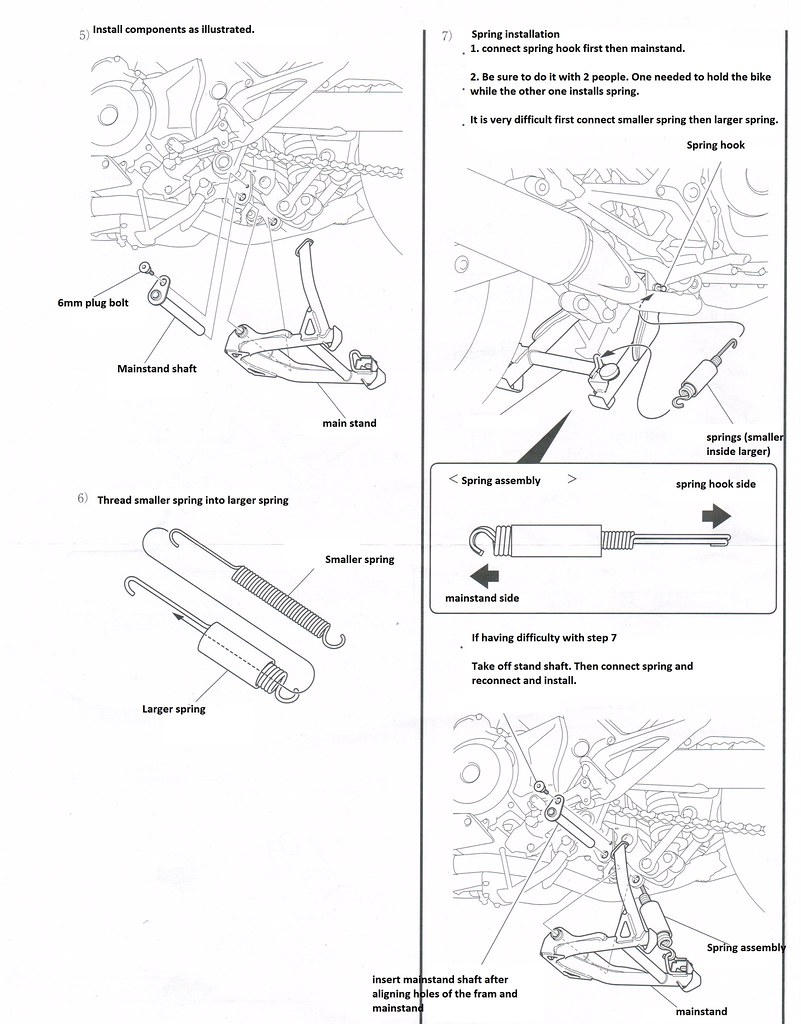
Reading here to prepare, I saw that the main spring was a beast, so for once I bought the right tool for the right job with Motion Pro 08-0127 Heavy Duty Spring Hook : Amazon.com : Automotive .

Even with that tool and the bike on a Trackside Roll on wheel chock TRACKSIDE - Roll On Wheel Chock - Tie-downs - Transport & Storage - Accessories - CycleGear - Cycle Gear and strapped I gave it all I had and JUST BARELY got the damn thing on.

Whew...

Pic here:

photo.jpg
 
Did you put the OEM side bags on? I read the PDF on that and looks like there is too much tupperware cutting for my heart to take on a new bike.

There is no cutting required on a 2013, unlike on a 2012, as the body panel design has been modified to accommodate the OEM side bag hardware.
 
Yeah that spring was fun...not. I also installed it solo on my wife's NCX. If I remember correctly there was some cursing involved. ;)
 
There is no cutting required on a 2013, unlike on a 2012, as the body panel design has been modified to accommodate the OEM side bag hardware.

This and Marotajo's response just made my day! I was not aware of this! Now to figure WHICH combination of parts I really need: looks like it is the bags, the mount and the panels.
 
This and Marotajo's response just made my day! I was not aware of this! Now to figure WHICH combination of parts I really need: looks like it is the bags, the mount and the panels.

I'm glad you don't have to cut them to because let me tell you the byproduct doesn't look so nice. Not on mine anyway. Congrats on the center stand. It comes in handy.
 
Following the instructions that come with the OEM stand makes installation a breeze instead of an ordeal.

Attach the ends of the spring prior to inserting the rod through the stand and frame. That plus one extra hand removes all the anguish and cussing from the task and cuts the time required down to next to nothing, so snag an assistant before tackling the job.

I had a harder time finding where to install the little bolt than I did installing the spring. This is truly a drama-free and no-special-tools-required task if you just do it the way Honda says to do it.
 
I agree with Mike Cash. I used the Honda method he describes and there was no reason to pull the spring with a tool. You use leverage on the stand to extend the springs. It helps to have a second person to tap the shaft in place, but that person need not have special skills or strength.
 
Yup, another one here who simply put the springs on first and then slipped the stand in place- no extra hands or person needed...

But aside from me being Mr. Smartypants Smugmeister about it lol,:eek: I do applaud your first farkling, that I do pig!

First of many happy ones, I hope. :D
 
Following the instructions that come with the OEM stand makes installation a breeze instead of an ordeal.

Attach the ends of the spring prior to inserting the rod through the stand and frame. That plus one extra hand removes all the anguish and cussing from the task and cuts the time required down to next to nothing, so snag an assistant before tackling the job.

I had a harder time finding where to install the little bolt than I did installing the spring. This is truly a drama-free and no-special-tools-required task if you just do it the way Honda says to do it.

I did notice this in the instructions as a 'plan B'. I guess I liked the cussing.
 
Yup, another one here who simply put the springs on first and then slipped the stand in place- no extra hands or person needed...

But aside from me being Mr. Smartypants Smugmeister about it lol,:eek: I do applaud your first farkling, that I do pig!

First of many happy ones, I hope. :D

I saw this in the instructions as a 'plan B' but never even mocked it up. Now I wish I had. I took a 'Surely, they can't be serious?!' attitude when I read that.
 
I let the guys at the dealer put my center stand on, since I was new to motorcycle ownership. Don't know if there was cussing involved, but I do know it took 2 guys to get it on, if that is any consolation to all you DIY people.
 
I used the string trick that was posted on here.I had my son watch the spring so I knew when it was pulled far enough.he said dad does the spring go in that hole or hook,I said yes.he says well it went in by itself.got lucky.
 
I installed the Honda center stand per the instructions and as I recall it said nothing about attaching both ends of the springs prior to inserting the pivot bolt. That must have been a revision that came later. A Honda tech from the dealer lent me a spring hook tool and it took some grunt but really wasn't a hard job.
 
I installed the Honda center stand per the instructions and as I recall it said nothing about attaching both ends of the springs prior to inserting the pivot bolt. That must have been a revision that came later. A Honda tech from the dealer lent me a spring hook tool and it took some grunt but really wasn't a hard job.

I didn't keep the instructions. I wish I had, because right now I can't remember if the instructions were in English or Japanese. I do remember reading on the forum the bit about the instructions prior to ordering my stand and then confirming it on the sheet that came with my stand from webike.
 
I think mine were in English on one side and Japanese on the other or at least there were two copies. I didn't keep them after the installation..
 
Here is a copy of a post by OriginalRocket. The Honda instructions say, at the end, that if you are having trouble installing the springs, then connect the springs first and then install the shaft. OriginalRocket goes on to explain how he executed that step from the instruction sheet.

Everything below is quoted from OriginalRocket's post:

------------------------------------------------------------------------------------------------------

8072644285_36edf76cfb_b.jpg


8072644915_b290c097e6_b.jpg


8072645647_f562bed006_b.jpg


Now, the pictures make this look all easy and such, and it is, if you follow my 1 hint for the very last part. If you did not have these instructions in English, you would miss the part where at the last step, they suggest you install the springs first, and then slide the shaft into the stand.

I had a friend help me on this last part. Those springs are very strong.

Here is my suggestion to make it quick and easy.

Tool needed are 1 rubber mallet.

Step 1. Connect the springs to the SPRING HOOK

Step 2. Connect the springs to the CENTER STAND

Step 3. Start on the LEFT SIDE of the bike. Slide the MAIN STAND SHAFT into the bikes bracket and into the stand itself.

Step 4. Use the foot press part of the MAIN/CENTER STAND as a hand hold, and pivot the stand into alignment as close as you can get it. Use a friend to help guild you. It will take a bit of strength, but not nearly as crazy as it is to stretch those springs.

As you pivot the stand into alignment (you are aligning the right side by the way) Use your free hand to swing the rubber mallet and moderately hit the MAIN STAND SHAFT to slide it into the right side bracket. This may take some finesse, but it works.

Step 5. Secure MAIN STAND SHAFT with the 6 MM PLUG BOLT. I used blue loctite, as I do not want this coming loose.

Installation took me all of 15 minutes.

Hope this helps,
 
Last edited:
Well there it is pretty clear at the end of step 7.

I was able to connect the springs in step 7 so I didn't have to remove the stand and connect the springs before installing the pivot. I was alone and as I recall the bike wanted to move backwards when I pulled on the spring tool so I think I secured the front wheel in my bolted-to-the floor wheel chock to prevent the bike from moving.
 
Back
Top