Miweber929
New Member
I know this is really a nothing mod, but I thought that I'd share it anyway because sometimes it's the little things that make a big difference and these mounts really worked great and for the money can't be beat.
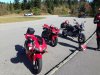
I bought the NC mid this summer as a one-up tourer to spend some extra time with my dad as we lost my mother in June and I knew he'd be spending the summer on his ST1100 trying to cope with the loss so I wanted to be able to go with him if I could at a moments notice without a lot of hassle getting ready. I also was hoping to sort of get a two-up mini-sport-tourer out of it as my fiancée and I have been taking three and four day trips on my 600RR and while I was ready for something more comfy, she really liked the seating position (not the seat but the way she was situated behind me) of the CBR, I was hoping this would work; what I discovered, however, was that while it worked as a single tourer fine, two up was really not working but it really excelled at commuting as well as it being a true do it all mount. So when a good friend of mine suggested a few weeks ago we take my dad down to the Smokey Mountains/Deals Gap area where my friend and I used to go riding all the time I thought it would be perfect for him to get away and us to end the year on somewhat of a high note. Since we'd be trailering from Minnesota to Tennessee (as time was a little short) I thought I'd let dad take the NC as he loves the bike, it would be a much lighter bike for the mountains and be a little change for him to play with. So very early in the morning on October 15th we loaded up in Minneapolis, picked up my buddy and his bike in Milwaukee and headed down south for 3 days of mountian riding at its finest.
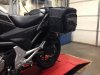
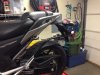
One of the things we needed was somewhere to carry luggage for the three of us and while I have a small set of bags for the CBR, it wouldn't really carry three days worth of gear for three people. Earlier this summer I picked up a set of Nelson Rigg CL-855 saddlebags after seeing StratTuners setup and while the are certainly huge, unless you build a rack setup like he did, the lower rear corners tend to want to go into the rear tire once you strap them down tight. I thought a bunch about making a setup like he did or even buying some pre-made racks that I could strap them to but time was tight and I wanted something less noticeable when the bags weren't on if I could. Basically the more I thought about it, the more I realized all I needed was a way to keep the ends from digging into the tire.
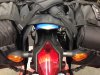
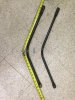
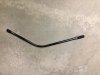
Being I needed something quick I ran over to the local Home Depot and started digging through their project metal. While I probably could have made something from what they had I just felt that $30 in aluminum flat stock was more than I needed to spend (and $20 if I did steel) so while I was leaving I came across the 1/2" emt conduit in 5' sections for $1.75 each and thought this would be perfect. So I measured up what thought would work and built two "boomerang" looking things that mount from the passenger peg to the rear fender that did nothing but simply kep the bags out from the suspension, exactly what was needed.
I bent the pipe to around a 30 degree angle to basically follow the subframe up at the same angle. I then simply flattened the ends in a vice, drilled holes to mount them and sprayed them black using simple spray paint. Like I said, simple and quick; I noticed the paint did rub off a bit on a couple edges but I do zero prep work and will end up sanding them down come spring and redoing the paint so it sticks.
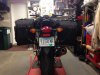
Take a look at the pics, you'll see what I did for under $5. Let me know any questions, they worked flawlessly over 500 miles that weekend and I don't see any signs of fatigue anywhere.
Simple, easy, works. Another thing that worked great was the way I strapped them allowed me to simply un-velcro the front strap for gassing up without moving the bags or removing anything. Simply unstrap the front, tip up the seat, fill up, close the seat, restrap the front. Easy.
Mike
I bought the NC mid this summer as a one-up tourer to spend some extra time with my dad as we lost my mother in June and I knew he'd be spending the summer on his ST1100 trying to cope with the loss so I wanted to be able to go with him if I could at a moments notice without a lot of hassle getting ready. I also was hoping to sort of get a two-up mini-sport-tourer out of it as my fiancée and I have been taking three and four day trips on my 600RR and while I was ready for something more comfy, she really liked the seating position (not the seat but the way she was situated behind me) of the CBR, I was hoping this would work; what I discovered, however, was that while it worked as a single tourer fine, two up was really not working but it really excelled at commuting as well as it being a true do it all mount. So when a good friend of mine suggested a few weeks ago we take my dad down to the Smokey Mountains/Deals Gap area where my friend and I used to go riding all the time I thought it would be perfect for him to get away and us to end the year on somewhat of a high note. Since we'd be trailering from Minnesota to Tennessee (as time was a little short) I thought I'd let dad take the NC as he loves the bike, it would be a much lighter bike for the mountains and be a little change for him to play with. So very early in the morning on October 15th we loaded up in Minneapolis, picked up my buddy and his bike in Milwaukee and headed down south for 3 days of mountian riding at its finest.
One of the things we needed was somewhere to carry luggage for the three of us and while I have a small set of bags for the CBR, it wouldn't really carry three days worth of gear for three people. Earlier this summer I picked up a set of Nelson Rigg CL-855 saddlebags after seeing StratTuners setup and while the are certainly huge, unless you build a rack setup like he did, the lower rear corners tend to want to go into the rear tire once you strap them down tight. I thought a bunch about making a setup like he did or even buying some pre-made racks that I could strap them to but time was tight and I wanted something less noticeable when the bags weren't on if I could. Basically the more I thought about it, the more I realized all I needed was a way to keep the ends from digging into the tire.
Being I needed something quick I ran over to the local Home Depot and started digging through their project metal. While I probably could have made something from what they had I just felt that $30 in aluminum flat stock was more than I needed to spend (and $20 if I did steel) so while I was leaving I came across the 1/2" emt conduit in 5' sections for $1.75 each and thought this would be perfect. So I measured up what thought would work and built two "boomerang" looking things that mount from the passenger peg to the rear fender that did nothing but simply kep the bags out from the suspension, exactly what was needed.
I bent the pipe to around a 30 degree angle to basically follow the subframe up at the same angle. I then simply flattened the ends in a vice, drilled holes to mount them and sprayed them black using simple spray paint. Like I said, simple and quick; I noticed the paint did rub off a bit on a couple edges but I do zero prep work and will end up sanding them down come spring and redoing the paint so it sticks.
Take a look at the pics, you'll see what I did for under $5. Let me know any questions, they worked flawlessly over 500 miles that weekend and I don't see any signs of fatigue anywhere.
Simple, easy, works. Another thing that worked great was the way I strapped them allowed me to simply un-velcro the front strap for gassing up without moving the bags or removing anything. Simply unstrap the front, tip up the seat, fill up, close the seat, restrap the front. Easy.
Mike
Attachments
Last edited: