Scot700xs
New Member
Thank you for your time and very concise directions. The pictures were a huge help. You gave me the confidence to try to do this by myself.
Follow along with the video below to see how to install our site as a web app on your home screen.

Note: This feature currently requires accessing the site using the built-in Safari browser.

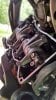
Just did my second valve adjustment and noticed something: it was virtually impossible to remove the timing cover without destroying it. It's plastic and crappy, so after one removal it would not come off again without destroying it. As such, I could not use the notches to find "top dead center".
In case you run into this problem as well, here's the simple solution:
Line up the 1/T mark like normal. Then physically move the rocker arms on the #1 cylinder. If they both have play (as in you can push them up and down), you are at Top Dead Center on the compression stroke. Verify it by checking the valve clearances (they should all be close to spec or in spec as they don't move much on these bikes). If you find that the intake valves are in spec but exhaust have 0 clearance, or visaversa, you are not on the compression stroke. Rotate the crank again and line the 1/T mark up again and start the process over.
I get what you are saying but the service manual gives a procedure for tightening the plastic cam shaft inspection cover so it doesn't get over tightened and can be removed multiple times without buggering it up. I've not noticed any problems removing it at the second and third valve checks.Just did my second valve adjustment and noticed something: it was virtually impossible to remove the timing cover without destroying it. It's plastic and crappy, so after one removal it would not come off again without destroying it. As such, I could not use the notches to find "top dead center".
In case you run into this problem as well, here's the simple solution:
Line up the 1/T mark like normal. Then physically move the rocker arms on the #1 cylinder. If they both have play (as in you can push them up and down), you are at Top Dead Center on the compression stroke. Verify it by checking the valve clearances (they should all be close to spec or in spec as they don't move much on these bikes). If you find that the intake valves are in spec but exhaust have 0 clearance, or visaversa, you are not on the compression stroke. Rotate the crank again and line the 1/T mark up again and start the process over.
Just did my second valve adjustment and noticed something: it was virtually impossible to remove the timing cover without destroying it. It's plastic and crappy, so after one removal it would not come off again without destroying it. As such, I could not use the notches to find "top dead center".
In case you run into this problem as well, here's the simple solution:
Line up the 1/T mark like normal. Then physically move the rocker arms on the #1 cylinder. If they both have play (as in you can push them up and down), you are at Top Dead Center on the compression stroke. Verify it by checking the valve clearances (they should all be close to spec or in spec as they don't move much on these bikes). If you find that the intake valves are in spec but exhaust have 0 clearance, or visaversa, you are not on the compression stroke. Rotate the crank again and line the 1/T mark up again and start the process over.
For the plastic timing cover--to install it back correctly you need to use a 0.10mm feeler gauge that you place between the cap and the engine block. Tighten the cap to the 0.10mm feeler gauge. Remove feeler gauge and tighten the cap more to only 30 degrees.
")
 Shows how little I know!
It's not?
Never thought about it. I do have the shop manual so I guess sooner or later, I would have seen it.