

The Phoenix
Site Supporter
After removing all of the body panels on the left side of the bike to replace my left pivot cover and then to install Denali B6 rear driving lights I decided that I would install a Denali harness in preparation to add some additional front driving lights. It wasn't like I had to remove anything else at this time. So I share pictures and comments of my installation of the Denali Premium Harness 2.0.
Certainly the fact that I didn't have to take off body panels was a big plus but I learned a few things to share.
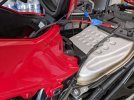
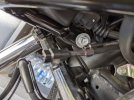
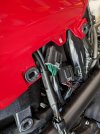
First I had the frunk battery cover off so it was easy to connect the harness to the battery. I taped the positive and negative battery wires up the side of the (I think) red side shelter. You'll note on the red wire (positive) there is an inline 10 amp fuse and there was adequate room to connect the wires. Once connected I dropped the harness wiring down and there was room for the back end of the harness to securely situate right in the open space you see in the "harness" picture. I then took the harness wiring (closest cluster of wires to the left) and moved them forward to the front of the bike. As I did so I saw that there was a socket bolt that initially prevented me from moving the harness upward behind the panel. This turned out to be a bit of luck. I removed the bolt, pulled the harness wiring upward and then screwed the bolt back in - which provided further support for the harness wiring.
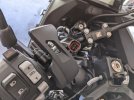
Just in case you are wondering there is enough room for the light connectors for the front driving lights with the installation on the 2021 NC750xd to connect to the wiring for the lights.
And there is more than enough harness wire to place the on/off switch on the left handle bar - in fact I have not connected the additional on/off switch nor connected the wire to an ignition source.
I now ride with the two connectors wrapped in plastic and now considering how to mount my driving lights.
Certainly the fact that I didn't have to take off body panels was a big plus but I learned a few things to share.
First I had the frunk battery cover off so it was easy to connect the harness to the battery. I taped the positive and negative battery wires up the side of the (I think) red side shelter. You'll note on the red wire (positive) there is an inline 10 amp fuse and there was adequate room to connect the wires. Once connected I dropped the harness wiring down and there was room for the back end of the harness to securely situate right in the open space you see in the "harness" picture. I then took the harness wiring (closest cluster of wires to the left) and moved them forward to the front of the bike. As I did so I saw that there was a socket bolt that initially prevented me from moving the harness upward behind the panel. This turned out to be a bit of luck. I removed the bolt, pulled the harness wiring upward and then screwed the bolt back in - which provided further support for the harness wiring.
Just in case you are wondering there is enough room for the light connectors for the front driving lights with the installation on the 2021 NC750xd to connect to the wiring for the lights.
And there is more than enough harness wire to place the on/off switch on the left handle bar - in fact I have not connected the additional on/off switch nor connected the wire to an ignition source.
I now ride with the two connectors wrapped in plastic and now considering how to mount my driving lights.
Attachments
-
 Premium Wiring Harness Battery Connection with inline fuse.jpg5.5 MB · Views: 55
 -
 Premium Wiring Harness Battery Connection headlight connections.jpg10.8 MB · Views: 55
 -
 Premium Wiring Harness Battery Connection on off switch.jpg11.5 MB · Views: 54
 -
 Harness wiring from behind red side shelter to front of bike.jpg7 MB · Views: 54