• A few people have been scammed on the site, Only use paypal to pay for items for sale by other members. If they will not use paypal, its likely a scam NEVER SEND E-TRANSFERS OF ANY KIND.

How To Foglight switch installation and wiring

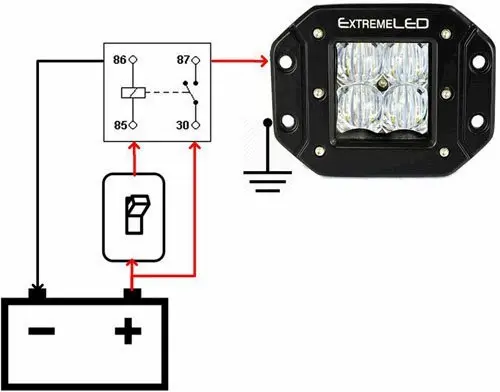
Interesting and detailed thread, which I appreciate. I'm not enough of an electrician to get fancy and so I have my Aux lights simply wired directly to the battery with a on/off switch I cut into the black plastic next to the handlebars. The switch illuminates when the lights are turned on, and this is a great reminder to turn them off. Other than a fuse in the system, there is nothing fancy or connected about it. Works great. My non-name brand cheapo LED lights also seem to work great for years.
 
I have had good luck on several of my bikes with inexpensive Harbor Freight led lights, but I think I may go slightly more upscale on this bike. I ride at night and it is a known fact that our deer are possibly the dumbest animal known to man. Plan on a combination spot on the left and flood on the right, this combo may help avoid some of the dumbest deer. I can ride 40 miles at night in my area and be surprised if I see another vehicle!
 
Does anyone have a good clear diagram or know where to find one to show how to install a light to a third party switch and also to the ignition. It should also have a relay included to be safe.

I'm trying to redo my lights as the one I bought (it was a kit) previously didn't work the way I wanted it to.
 
I have had good luck on several of my bikes with inexpensive Harbor Freight led lights, but I think I may go slightly more upscale on this bike. I ride at night and it is a known fact that our deer are possibly the dumbest animal known to man. Plan on a combination spot on the left and flood on the right, this combo may help avoid some of the dumbest deer. I can ride 40 miles at night in my area and be surprised if I see another vehicle!
Those deer and my dog, the dumbest dog ever, should hang out.
 
Jeez guys. Just buy a Healtech thunderbox. Wire it direct to the battery and plug your stuff in. Much much easier. Cheaper too
They do seem to be pretty easy and the only problem I heard of was related to heated grips causing it to not shut down. That was early though and they might have worked through it. It was not an isolated issue.
 
Jeez guys. Just buy a Healtech thunderbox. Wire it direct to the battery and plug your stuff in. Much much easier. Cheaper too
Already have a healtech thunderbox installed. Its the part where to lights go to the relay and switch that I need the wiring diagram to do a correct installation.
 
Just hook the lights to the Thunderbox--engine on the lights are on. Shut the engine off and the lights shut off. No switch or relay needed. Easy peasy
 
I would say a general digram. The only thing specific to the NCX would be how to remove the frunk and I should be able to look for videos for this.
Here are a few things that may help. The inline image below I borrowed from this page. It's for a 4-post relay. Note that the relay terminals have numbers in that diagram. Those numbers are essentially universal to 4-post relays one commonly finds in auto parts stores in the USA.

HERE is an ADVRider thread with various diagrams, pictures, and attempts at explanation. If you can put aside the fluff, there's solid and straightforward info there.

bp-relay-details.webp
 
Several of the things I'll cover in this post I learned from a previous post on this subject. Thanks to everyone who contributed there and helped point me in the right direction, in particular @mzflorida for doing the research on where to find the switch. It's not easy to find for sure! I thought I'd take a few minutes and put everything that I've learned about the switch installation and wiring in one post.

  • The switch is Honda part number 08V02-MKA-D80 and it can be purchased here. CMS is in the Netherlands. It took about a week for the switch to ship (I'm assuming that they had to order it). CMS has a very nice website and they communicated very well regarding the order. Between the switch and FedEx international shipping the entire amount came to +- $40 USD. I have no idea why this switch is so hard to find and is not sold in the US. Thanks again @mzflorida!

  • The connectors that will mate to the connector on the switch's lead can be purchased from CycleTerminal.com. You will want the 4 pin 2.8mm - .110 Male and Female locking connector - Nylon Connector with Terminals (see the picture below). If you have any questions you can email [email protected]. Joe was very quick to answer my questions via email, and shipped my order within a couple of hours of when I ordered. I ordered two sets @ $2.50 each, and including USPS first class shipping my total came to +-$10.00 USD.

    View attachment 51467

  • If you would rather have a pigtail made instead of installing the connectors directly to your own wiring Jim at EasternBeaver.com can make one for you. Jim can be contacted at [email protected].

  • This video will show how to remove the panels that you'll need to remove to install the switch on an earlier NC750X (up through 2020). The video is about replacing the air filter, but the first steps are the same. I haven't found a video showing the 2021+ installation so I'll either have to just wing it, or wait for my service manual to arrive which is supposedly on its way!

  • Instead of connecting my fog lights directly to my bike's existing wiring, I installed a Rowe PDM60 Distribution Module and installed it under the rear seat. I purchased it from Rocky Mountain ATV/MC for about $213.00 USD including tax. Yes, that's a little pricey but I'm adding other items that need to be wired and this is an easy way to do a professional installation in very limited space. I did have to remove the ears on the PDM60 in order for it to fit under the seat. I also had to remove the rubber boot that was around the wiring under the rear seat to allow the connectors to lay down instead of being in a bunch to pick up some much needed room.

  • Also, for the PDM you'll need to find a conductor to tap into that will be hot when the ignition is turned on. This will let the PDM know that the ignition is on so it can then trigger its internal breakers/relays. The trigger circuit draws very, very little current. Since I was working on the rear of the bike anyway I just tapped into the taillight conductor.

  • In order to run the wiring down the length of the bike I had to remove several of the plastic panels. This is a PIA, but this video from Malstad was a big help. Just make sure you keep track of which screws and plastic pop-in connectors go where!

  • Speaking of running the wiring down the bike, I used some of this split wire loom tubing that I found on Amazon and it helped make the installation easier and more professional looking. Also, this 250 piece heat shrink connector kit has been indispensable as has this heat shrink tubing kit. If you don't have a heat gun yet there are a number of them on Amazon for +- $20 USD. (No, I'm not an Amazon affiliate.... just a daily customer!) .
Ok, on to the actual wiring. The photos at the end of this post should be helpful.

The switch is a single pole pushbutton switch with a backlight that lights up when it's in the on position (depressed). The back of the switch has 4 wires that go the connector that you will connect to your wiring. You can either install a connector directly to your wiring, cut the connector off and use butt splices or whatever, or you have have a pigtail made by EasternBeaver and connect to that. Regardless, you need three conductors going to the switch.

1. A hot lead (this should come off of a circuit that's only hot when your ignition switch is on. Fortunately for me the PDM60 made this easy.
2. A conductor going to your lights (the switched conductor)
3. A common (ground) conductor

You will notice that on the back of the switch there are 4 conductors, but at the other end of the pigtail there are only 3. That's because the conductor for the switch's light is spliced into the switched conductor inside of the pigtail. I've clearly identified the "hot" conductor, the switched conductor that goes to the lights, and the ground conductors in the photos below.

If you have any questions just let me know and I'll do my best to answer them!

Steve

View attachment 51468
View attachment 51469
View attachment 51470
View attachment 51471
Thank you, this helped me a lot.
 
Back
Top