• A few people have been scammed on the site, Only use paypal to pay for items for sale by other members. If they will not use paypal, its likely a scam NEVER SEND E-TRANSFERS OF ANY KIND.

2023 NC750X rear shock removal

oldwisedude

Member
Joined
Sep 29, 2023
Messages
32
Reaction score
28
Points
18
Location
West Sussex, England
Visit site
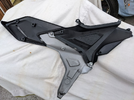
As we know, after 2021 Honda lowered the ride height of the NC750X, changed side panels, shortened the suspension travel plus other styling changes. I will be upgrading my rear shock next week so wanted to understand what is entailed. The most difficult part is accessing the top fixing bolts. I attempted to remove what seemed like the appropriate side panels but these are fiendishly interlinked with all the other panels and cannot be removed in isolation. So I could not get convenient side access to the top fixings. The lower fixings are easy but I wanted to solve the top fixing access problem first, otherwise I would delegate the job to my Honda dealer.

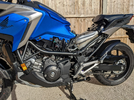
You either need a centre stand or some stable lifting equipment to ease the weight from the rear wheel but still leave it resting on a thin block of wood or just touching the ground. All bolts are fitted from the left side, with nuts on the right side. The nuts are 17 mm A/F, bolts are 14 mm A/F and 8 mm Allen socket.

I could barely see the top fixings - they are so tucked away. Getting head, eye and torch in position and then locating a spanner is very challenging. The RH top nut needed the longest 17 mm combination spanner that I had, hooked up to a similar ring spanner to give it extra leverage. I also alternated with a fine-toothed 3/8 drive ratchet and small socket. The LH side 8 mm Allen bolt could be reached (just) from the rear, accessing above and around the chain area, provided you have small hands (I had to removed my rear hugger to improve access).

Needless to say you can barely get a 30th of a turn on anything, because you haven't room to swing the spanners. (On the production-line Honda would undoubtedly fit the shock before the side panels were fitted). So it means a tiny bit using the ring, then a bit with the socket, then a bit with an open-ender, then back to the ring and so on. The LH 8 mm Allen bolt was difficult to locate, since with only six flats available I had to let the RH self-locking nut rotate the bolt until I could locate the Allen. What a rigmarole! But heroically I eventually succeeded, without damaging any nuts or bolts.

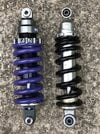
Once I proved I could remove the top bolt I then removed the bottom fixings (easy job), dropped the shock out and greased the pivots at the same time.

Much of the time is initially spent gathering a selection of tool options, of which I have plenty. The top shock bolt removal is extremely tedious but it can be done in situ without panel removal but the job needs immense patience. (It is easier on pre 2021 models)

(see later posts - the centre side panels can in fact be removed separately and easily, making access to rear shock bolts very easy)
 
Last edited:
I think I would just bite the bullet and remove the plastic. I'll be doing something similar in the not too distant future.
BTW, what rear shock have you upgraded to?
 
Maxton NR4.

Removing the plastics on 2021 onwards NC is no walk in the park either. I suspect that you'd need to begin at the front of the bike and remove every single panel from both sides, working your way to the rear and amassing loads of removed fasteners en route. Its a major faff.

The rear shock replacement would have been so easy if Honda had provided a small removable circular blanking cap in-line with the top shock bolt.

(see later posts - the centre side panels can in fact be removed separately and easily, making access to rear shock bolts very easy)
 
Last edited:
Adjusting the stock shocks no wal in the park either. I found a small hook wrench with a 3/8 drive hole in it and use an assortment of extensions and adjust the shock from the bottom. Honda could have given some consideration to shock preload adjustment. I did install the Cogent Dynamics front fork kit in my 22 DCT and it is measurably better. I will change the hind shock …..someday.
 
Adjusting the stock shocks no wal in the park either. I found a small hook wrench with a 3/8 drive hole in it and use an assortment of extensions and adjust the shock from the bottom. Honda could have given some consideration to shock preload adjustment. I did install the Cogent Dynamics front fork kit in my 22 DCT and it is measurably better. I will change the hind shock …..someday.
Cogent are a very helpful company and their products give good results and are well liked. Importing Cogent to the UK is not so easy.
I am also (and more importantly) replacing the forks with Maxton SD20 cartridges, hopefully installing it all within the week.
 
Last edited:
I don't know how difficult the 2023 is but I just took mine off my 2019 in about 10 minutes. I took one small bolt off the rear side panels. You can pull the panel out far enough to get a socket with an extension in the right side. There is an access tube where the nut is. The other side is an Allen head. I didn't have to hold this, the nut came right off. After the nut is off push the bolt out with a punch or something, once it's started you can grab it with your fingers from the left side. 1st you must disconnect the coupling links and remove bottom shock bolt. I only took one bolt out. I used a tie down strap thru the wheel and around the seat to hold the wheel up while doing this. Hopefully you have a center stand, makes it much easier. Put some tape around the nut when reinstalling. Took me less than 20 minutes to do the whole job. I don't imagine the 2023 is much if any different.

BTW- I have a really nice rear shock in the classified section for sale. Im not sure it fits the newer models though. I had it on a 2019. Made a world of difference.
 
Last edited:
Unfortunately the models made after 2021 are significantly different and your method cannot be deployed on those. However, a helpful guy on a similar UK forum has shown that the complete side panels come off as a one-piece unit, comprising different shapes and colours, but still leaving the tank cover and all front plastics still in place. It is held in place with poppers and seven rubber grommets (on LHS shown).


I am going to investigate today, since it would be preferable to the struggle that I had.
 

Attachments

  • image_2024-05-11_070205712.png
    image_2024-05-11_070205712.png
    1.1 MB · Views: 11
  • image_2024-05-11_070401834.png
    image_2024-05-11_070401834.png
    2 MB · Views: 12
Once the side panels are removed as he shows, the rear shock job is easy. No need to faff around like I did. I'm possibly the only guy on the planet who's done it in situ without removing these panels! We live and learn!
:D


I mistakenly thought that more panels would have to come off. Knowing where the seven hefty rubber grommet fixings are located is a huge help, since they always need a brave tug. I removed my panels in about 10 minutes and have treated the grommets with rubber grease ready for re-installing (the panel arrangement is different on the pre-21 models)

The rear shock job will now be a doddle.

Forum help at its best

old(wiser)dude
:thumbsup:
 
Honda builds wonderful motorcycles but the plastic work is origami. Expensive origami! I had a new Goldwing, the same department designed the air filter access as the newer NCs. Misjudge and break one of these little tabs, and it gets expensive quickly.
 
As with most stock bikes, our NC's suspension is a compromise. Honda and Showa have cunningly attempted a one-size-fits-all system, using progressive springs and unsophisticated damping, to keep costs down. The bikes tend to be under-sprung and over-damped.

To address these shortcomings, I fitted the Maxton SD20 front fork legs and the NR4 rear shock to my 2023 NC750X-DCT two days ago. Installation was straightforward. I had ensured that the bike had not moved at all since I removed the original forks and shock. Consequently the Maxton shock fitted perfectly, having exactly the same eyelet hole centres as the OEM unit (302mm). Access to the rear shock is easy once the centre section of side panels is removed (remove two poppers and bravely tug seven rubber grommets on each side)

I had discussed with Maxton in great detail what I needed and they set the suspensions up accordingly, providing comprehensive data booklets with my start settings clearly stated, so that I could try different settings and still revert back to their suggested base settings if I wished to.

Front SD20 fork cartridges

The front fork kits are of particular interest. The left fork deals with compression damping, the right fork with rebound damping. Both have been fitted with new linear non-progressive 0.75 kg/mm springs tailored for my rider weight (solo 72kg rider weight, no pillion, comfortable touring only, no track use etc). The internal pre-load has been set to 2mm, to maintain a 10mm bike sag and the same ride height as before. British-made SF2.5 grade Syntol fork oil has been used in the compression leg. Compression damping has been set to base minus 15 clicks (more clicks reduces damping. 20 clicks available)

The right side rebound leg uses Syntol SF10 grade oil. Rebound damping is set to base minus 12 clicks (20 clicks available)

Air gap in both legs is 135mm, although this is not relatable to the stock design air gap.

The only visual difference from stock is that the fork caps are marked "COMP" and "REB" and have two small Allen screws for adjustment.

Rear NR4 shock unit

The spring fitted for my weight is 17kg/mm (950 pounds/inch)

Compression and rebound are separately adjustable and Maxton have set these for my criteria, although I can alter if I chose to.


On the road

The bike sits at the same angle as before on its side stand. When I sat on the OEM bike, it would always sag a lot and consequently tilt the bike more upright via the side stand. This does not now happen.

If I balance on the footpegs (with colleague holding the bike upright) and bounce up and down, the whole bike rises and falls in parallel as one integrated unit.

I set off and braked at the T junction. The bike did not dive nor writhe as before - it maintained a stable posture. Accelerating up the road and swerving around a myriad of potholes the handling and response immediately felt more accurate and direct.

I rode 160 miles along many familiar roads and lanes to make useful comparisons. The ride comfort is much less harsh but still reassuringly firm. It is a weird thing how better suspension makes the bike feel firmer but manages to achieve this whilst improving comfort. It is, of course, because the clever, rapid-acting 'high-speed' compression and rebound damping are absorbing all the irritating road irregularities without transmitting them to your hands and backside. The wheels go up and down rapidly but the bike doesn't.

I pressed on, my confidence increasing by the mile. The low centre-of-gravity NC has always felt easy to corner but now it feels totally stable and safe, almost sporty. I railed into choppy bends, knowing that the forks would follow the road and stay on line. I am really impressed with the improvement in grip. This is because the tyres are now staying on the tarmac rather than dancing and skipping over the awkward stuff. Holding a line through corners is now accurate and predictable. Braking is now safer and more stable, devoid of diving and lurching. The upgrade has achieved everything I hoped for and made a good bike into a corker. Expensive upgrade? Yes. But good things in life often are. The Maxton suspension has also imparted that magic ingredient - CONFIDENCE.
 

Attachments

  • Image 18-05-2024 at 10.19.jpg
    Image 18-05-2024 at 10.19.jpg
    205.6 KB · Views: 2
Last edited:
Unfortunately the models made after 2021 are significantly different and your method cannot be deployed on those. However, a helpful guy on a similar UK forum has shown that the complete side panels come off as a one-piece unit, comprising different shapes and colours, but still leaving the tank cover and all front plastics still in place. It is held in place with poppers and seven rubber grommets (on LHS shown).


I am going to investigate today, since it would be preferable to the struggle that I had.
Can you post a link to that other forum's description of how to remove the side panels? Thanks.
 

Look for posts from Viator. On May 9 he posted photos. If you zoom the photos you will see that there are seven big rubber grommets that line up with male capstans on the side panel. You need to press out two plastic rivet things (the ones you carefully press the centre bit inwards to release the whole rivet). One of these rivets has a 'Philips' head screw centre - just give it quarter turn to release. Then I used a plastic door card lever to ease the top of the side panel away from the coloured tank area slightly. Then I got my fingers into the gap and started to pull outwards. One by one the grommets released. at the bottom corner of the pointy silver section is a round horizontal grommet that hook over a vertical male pin about 5mm tall. You need to lift the entire panel up and off this pin. Then pull the entire panel forward and slightly down so that it slips out of its rear location.

Like all descriptions of procedures it sounds complicated but it isn't in practice. Study the photos. You will observe where the big grommets are, which will give you confidence when pulling the assembly off the bike. It is not necessary to remove the tank cover, nor the rear-end light trims.

Let me know if you need more help - sometimes you can't access posts on certain forums unlike you register with them. I also included images on my post number 7, which should help.
 
Back
Top